

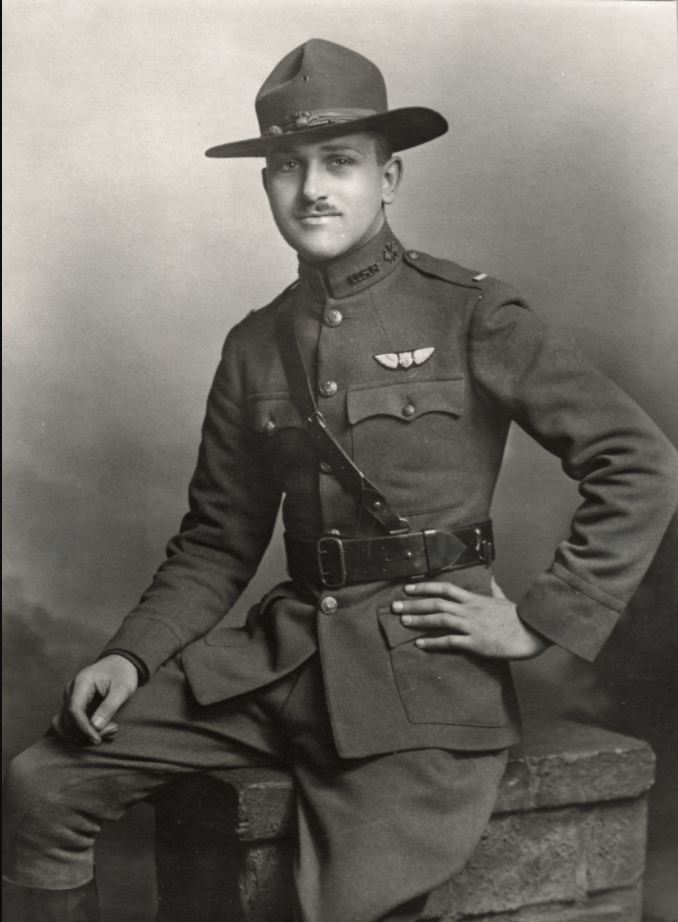
(Troy, New York, June 13, 1894 – near Lagnicourt, France, August 24, 1918).1
Training in England ✯ With No. 3 Squadron ✯ With the 17th Aero Squadron ✯ Epilogue
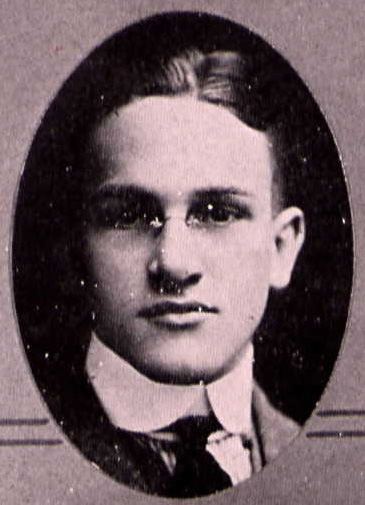
On Hamilton’s mother’s side, the Andrews family had lived in New England—Connecticut and then Vermont—since before the Revolutionary War. Hamilton’s paternal grandfather came to New York from Ireland; his father, John Augustus Hamilton, studied at Syracuse University and went on to take a degree in theology and to serve as a Methodist pastor. Lloyd Andrews Hamilton, an only child, was born in Troy, New York. The senior Hamilton’s calling soon took the family to North Adams, Massachusetts, then to Saratoga Springs, New York, and, in 1909, to Pittsfield, Massachusetts.2 Hamilton graduated from high school in Pittsfield in 1911 and then spent a year at the Jacob Tome Institute, a private college preparatory school in Port Deposit, Maryland.3
Like his father Hamilton attended Syracuse University, graduating in 1916. In the fall he began studies at Harvard’s Graduate School of Business Administration.4 At some point he became engaged to Ruth Houghton McKernon, a student at Vassar.5 In 1917 or early 1918 Hamilton’s parents moved to Burlington, Vermont, where they resided for several years; this accounts for the younger Hamilton sometimes being associated with that city and state.6
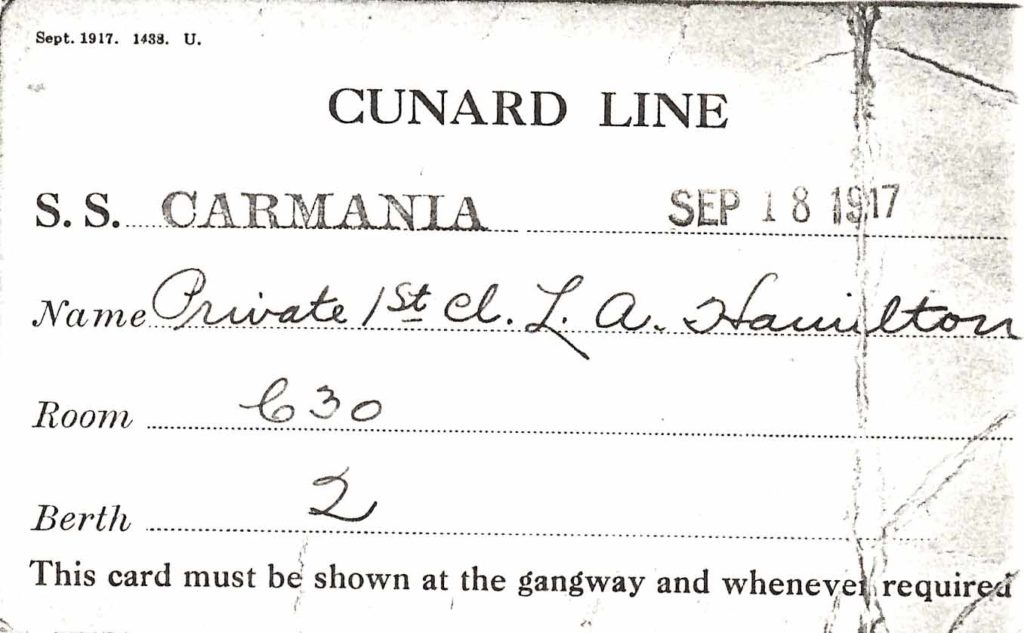
In the spring of 1917 Hamilton, now at the Officers’ Training Camp at Plattsburg, New York, was one of twenty-five men there (soon reduced to twenty) selected in July 1917 for aviation training at M.I.T.’s School of Military Aeronautics.7 Along with about one third of the M.I.T. ground school class that graduated August 25, 1917, Hamilton chose or was chosen for flight training in Italy and joined the 150 men of the “Italian” or “second Oxford detachment” who sailed to England on the Carmania.8 They departed New York for Halifax on September 18, 1917, and departed Halifax as part of a convoy for the Atlantic crossing on September 21, 1917.
When the Carmania docked at Liverpool on October 2, 1917, the detachment learned to their initial consternation that they were not to go to Italy, but to remain in England and attend ground school (again) at the Royal Flying Corps’s No. 2 School of Military Aeronautics at Oxford University. The men quickly made their peace with the change of plans; they were able to breeze through their courses, and they enjoyed the amenities of Oxford and the welcome extended to them. Hamilton’s fellow second Oxford detachment member William Ludwig Deetjen recounts going, two weeks after arriving in England, with Hamilton, Harvard DeHart Castle, and Eugene Hoy Barksdale to the home of the Morrisons, “an American family living here. We had tea, & a pleasant all round afternoon.”9
On November 3, 1917, Hamilton travelled with most of the detachment to Harrowby Camp near Grantham in Lincolnshire to attend machine gun school. There he shared a hut with four men from his M.I.T. ground school class, Castle, Henry Bradley Frost, Edward Addison Griffiths, and Melville Folsom Webber, as well as Parr Hooper, Edward Russell Moore, and Thomas M. Nial.10
Training in England: Tadcaster, South Carlton, Turnberry, Ayr
Hamilton was one of the fifty men from the second Oxford detachment chosen in mid-November to leave Grantham for flying schools. On November 19, 1917, he, along with Frost, Joseph Kirkbride Milnor, Joseph Ralph Sandford, and Hugh Douglas Stier, set off for No. 14 Training Squadron near Tadcaster in West Yorkshire.11 A picture of them captioned “The Big Five at Tad” is preserved in Milnor’s photo album, along with a number of other photos of Hamilton, Milnor’s “best pal but Doug [Stier].”12
The training planes used at No. 14 were Maurice Farman Shorthorns (“Rumpties”). Hamilton, along with Sandford and Frost, was assigned to A flight. Assuming Hamilton’s progress resembled Milnor’s and Stier’s in C flight, he would have had his first (dual) flight before Thanksgiving and would have flown solo in the first part of December.12a On December 20, 1917, Hamilton, Milnor, and Stier departed Tadcaster for South Carlton, where they were initially posted to No. 45 T.S. and then, on December 31, 1917, to No. 61 T.S., also at South Carlton.13 That same day, Hamilton made his first brief flight in an Avro.14 On January 3, 1918, according to the entry in Milnor’s diary, “Doug and Ham both went solo and are very confident”; on January 16, 1918: “Ham has finished his 20 hrs solo and his name has gone in for a commission.” (It was not until a month later that Pershing actually forwarded the recommendation for Hamilton’s commission to Washington.)15 Hamilton spent his four days graduation leave rather tamely in nearby Lincoln, where Milnor came out to see and dine with him.15a Back at South Carlton on January 24, 1918, Hamilton went “for his first flip on a Camel.”16
It was presumably while Hamilton was at South Carlton that a crash described by John McGavock Grider took place. In a letter apparently written from London Colney sometime in January 1918, Grider tells of a “boy named Hamilton [who] lost his engine or rather it stopped right over a wood. He came down scared stiff, one wing was taken off by a tree and the fucilage [sic], or body, lodged in a tree and broke off just behind his seat. They found him standing on the ground under the tree cussing like a blue streak because he had torn his new fur-lined flying coat while climbing down!”17 Hallifirs Plantation, a large rectangular woodland immediately south of the South Carlton airfield, may be where Hamilton came down.18
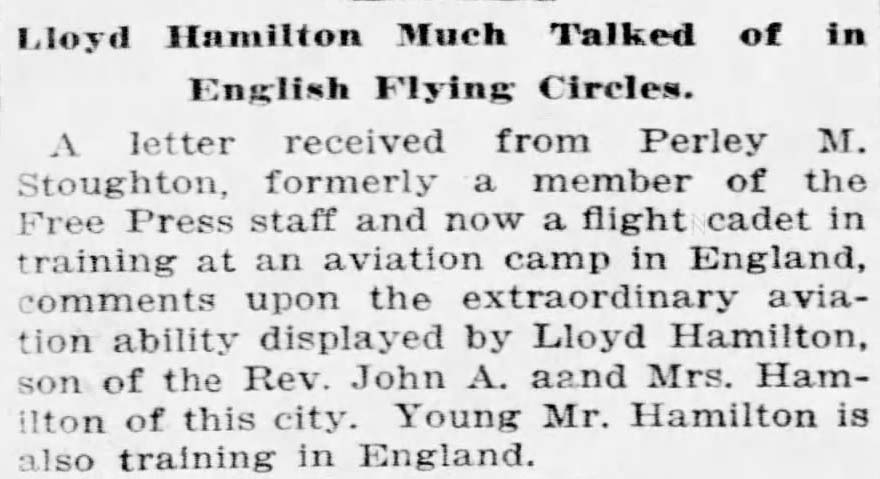
It was probably also with reference to Hamilton’s flying and rapid progress at South Carlton that his fellow second Oxford detachment member Perley Melbourne Stoughton, in a letter home, wrote of him that “Hamilton is very much of a success. Luckily, he was posted to another aerdrome [sic] not so crowded and has put in a long time in the air. He is very much talked of, not only by the Americans but also by the English, and is especially well thought of by his instructors. He is more than clever with a machine and is the best pupil at his aerdrome at present and probably one of the best in the R.F.C. I understand that he was offered the job of instructor in this country but passed it up. . . . Flying is natural with him and he puts the fastest ‘bus’ through all her stunts with all kinds of assurance.”19
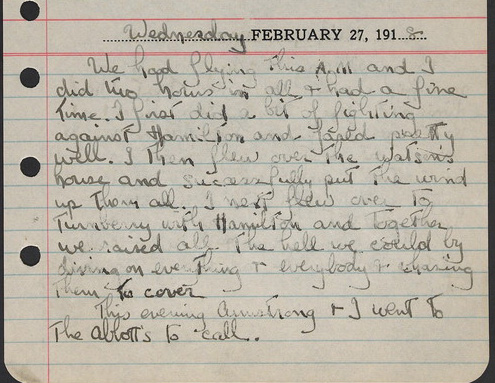
On February 6, 1918, Hamilton left South Carlton for the School of Aerial Gunnery at Turnberry in Scotland.20 The cablegram confirming Hamilton’s appointment as a first lieutenant, finally, is dated March 2, 1918, by which time he had moved on to the School of Aerial Fighting at Ayr in Scotland.20a Gustav Hermann Kissel, stationed at Ayr, recorded in his diary for February 27, 1918, that “We had flying this A.M. and I did two hours in all and had a fine time. I first did a bit of fighting against Hamilton and fared pretty well.” Both men were presumably flying Sopwith Camels, given their later assignments.
Perhaps in connection with his commission, Hamilton went to London at the beginning of March, stopping at South Carlton on the way and travelling from there to London with Milnor; he set off back to Scotland on March 5, 1918.20b Training at Ayr did not last long. David Sinton Ingalls, a U.S. Navy pilot with whom Hamilton briefly roomed there, wrote that: “Once the boys get to Ayr they are generally allowed to finish before they go to the front, but it seems just now things are going badly. It resulted in our getting started today.”21 Presumably in anticipation of the Germans’ Spring Offensive, men were being moved through their final training more quickly than previously.
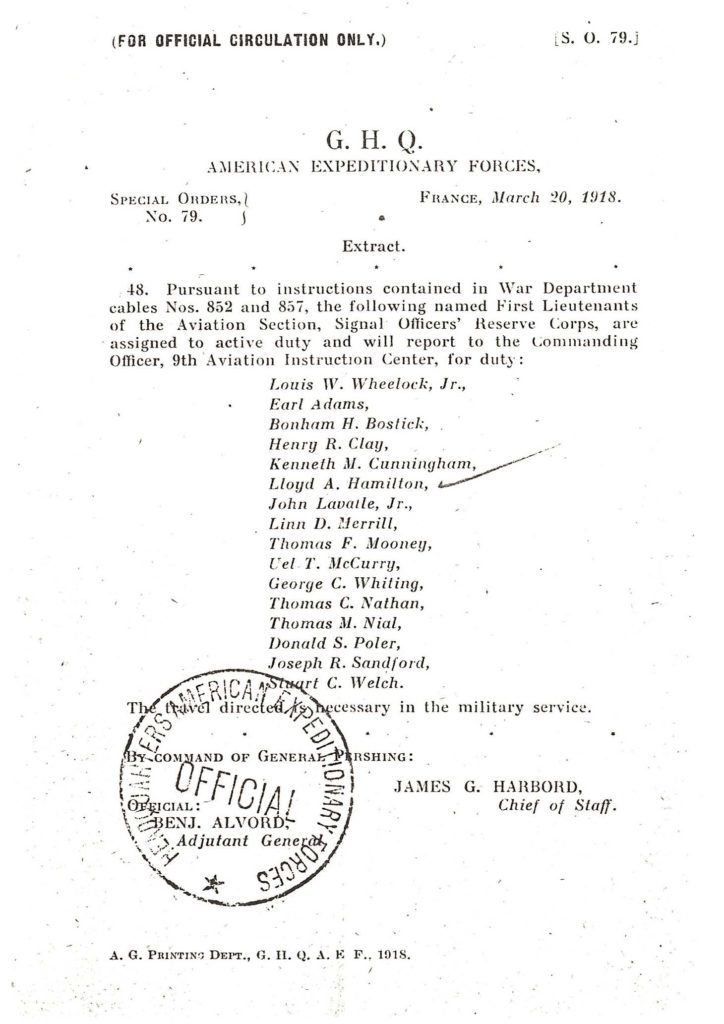
Thus, on March 14, 1918, Hamilton learned that he and Kissell, as well as Errol Henry Zistel and George Clarke Whiting of the first Oxford detachment, and Murton Lewellyn Campbell and Sandford of the second, were to be posted to R.F.C. squadrons in France; Campbell remarked that “I did not like the idea on account of not finishing the course.”22 They left that evening on an overnight train for London. Murton Campbell’s diary entry for the next day recounts how they arrived “in London about 8:30 after a rather cool and tiresome journey. We first took our baggage to Vic[toria] Station, ate breakfast, and went to Aviation Headquarters where we hung around until one o’clock. After lunch we visited American Hdqrs. for instructions and returned to R.F.C. again. Major General [Charles Alexander Holcombe] Longcroft gave us a talk, on account of our being the first Americans attached to R.F.C. to go overseas. [Henry Robinson] Clay reported about this time so as to take Zip’s [Zistel’s] place, who has not received his commission. Sandy, Whiting, Ham and I were sent out about 15 miles to take a gas course.”23
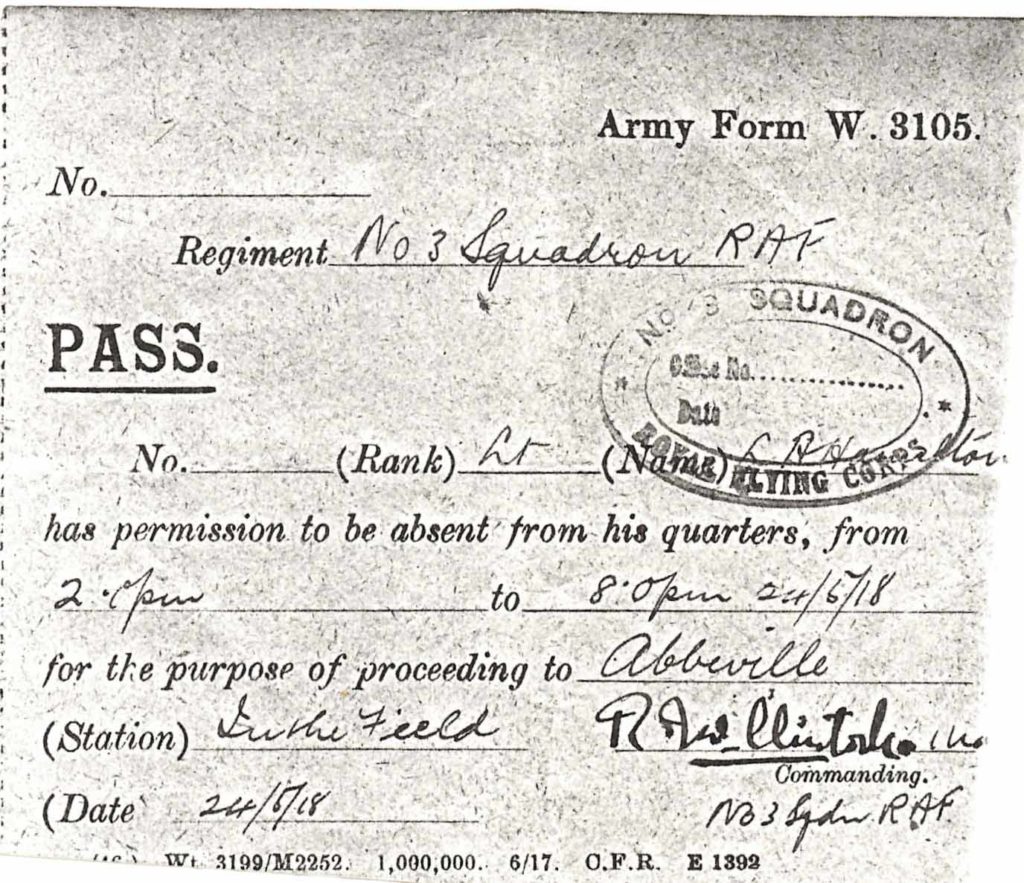
The next day, Saturday, March 16, 1918, the four men set out from Charing Cross for Folkstone and there embarked for Boulogne (Kissel, and presumably Clay, crossed separately24). Arrived in France after a two-hour crossing, “Sandy, Ham and Whiting were posted direct to squadrons”—Hamilton to No. 3 Squadron R.F.C.25 The next day he was in Paris, where he encountered Ingalls on his way to Dunkirk for further training; Hamilton proceeded from Paris to No. 3 Squadron at Warloy, about twelve miles northeast of Amiens.26 A number of Americans flew with No. 3 Squadron, but Hamilton was the only man from the second Oxford detachment. About two weeks later, on April 3, 1918, he was joined by William Dolley Tipton of the first Oxford detachment.27
With No. 3 Squadron R.F.C. / R.A.F.
According to some sources, R.F.C. pilots newly arrived at the front spent three weeks getting to know the squadron and the area before going over the lines.27a Assuming Hamilton arrived at No. 3 Squadron on March 17, 1918, he would not have gone over the lines until April 7, 1918. Charles Louis Heater noted that the R.F.C. (which, as of April 1, 1918, was the R.A.F.) sometimes bent this rule for Americans, but the example of another American, Curtis Kinney, who was assigned to No. 3 on March 9, 1918, and began flying “regular patrols” on March 30, 1918, suggests that No. 3 Squadron did not.28
On March 18, 1918, No. 3, a Camel squadron whose sector extended from Albert to Arras, was engaged in low strafing, with nearby No. 56 Squadron’s SE5a’s flying protection; bad weather meant little or no flying the next two days.29 Before dawn on March 21, 1918, the German Spring Offensive began.
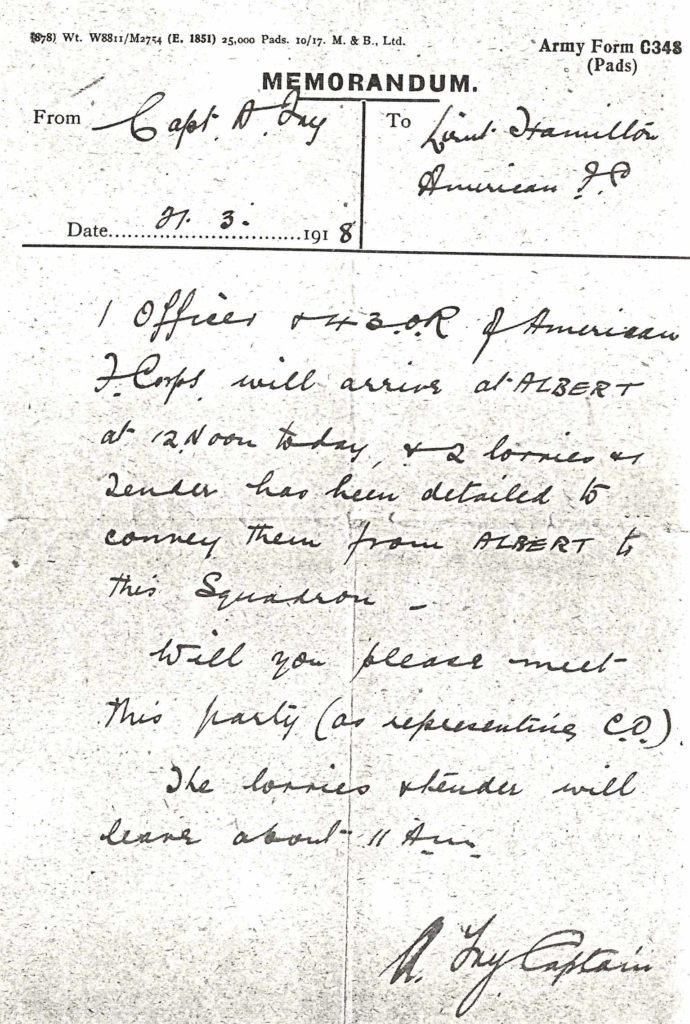
This was also the day when the air mechanics of the U.S. 148th Aero Squadron, divided into three flights, were to arrive at the three British squadrons to which they were temporarily attached for training in Sopwith Camel maintenance. B flight, assigned to No. 3 Squadron, apparently set out from Rouen by train the morning of the 21st and proceeded to Albert, where they were told to remain on the train and proceed to Bapaume; this led them directly and literally into the line of fire. When a shell exploded in front of the train, they were forced to reverse. “When the train pulled back into Albert, an American pilot, named Lieut. Hamilton, then with No. 3 Squadron, R.A.F., was at the station to meet them. He had motor-lorries ready.” The next day, at Warloy, the men of the 148th’s B flight started to learn about Camels.30 However, with Bapaume taken by the Germans on March 24 and Albert threatened, both No. 3 and No. 56 were soon forced to move. The night of March 24–25, 1918, No. 3 Squadron was at Vert Galant with No. 84 Squadron, about ten miles west northwest of Warloy.31 The next day they moved another mile and a half northwest to Valheureux; they were now about ten miles due north of Amiens. No. 56 Squadron had arrived the previous day, and both squadrons would remain at Valheureux into October.
According to Kinney, recalling his time with No. 3 some fifty-four years later, their “flight assignments” at this time “were Close [as opposed to distant] Offensive Patrols, Wireless Interception, Low Bombing and Strafing. We flew one to three flights a day but in bad weather flying was washed out.”32 Offensive patrols and low bombing and strafing were scheduled by the squadron; wireless interception by the enemy. Harold Balfour, of nearby No. 43 Squadron, described this relatively new concept: “On our aerodrome there was a wireless listening post in telephonic communication with a similar post some twenty miles to the south. When a German Artillery Co-operation two-seater was heard sending out its Morse code messages these two stations took cross bearings and so located, approximately, the map square in which the enemy was operating.” Pilots were on standby and “we could put four machines into the air within two minutes of receiving the location message.”33
Kinney goes on to tell of patrols that occurred soon after Hamilton would have begun crossing the lines. On April 11, 1918: “between Albert and Arras, our offensive patrol came upon three formations of Hun fighters at twelve thousand feet and we chased them. No damage was done on either side. The next day on the same patrol we failed to turn up any Germans.” Hamilton in C flight (Kinney was in A) had a rather different experience, for on April 11, 1918, he and others from his flight encountered and fired on an LVG C, a two-seater reconnaissance aircraft, in the vicinity of Ervillers (about twenty-four miles east northeast of Valheureux). Hamilton’s combat report narrative reads: “Whilst on C.O.P. the Leader dived on an E.A., and Observer was killed, as no shote [sic] were fired as I dived on him. I fired 150 rounds into him at 60 yards range with no apparent effect. The L.V.G. dived E.”; Hamilton’s report has the notation “1 Indecisive Combat.”34 The entry for the encounter in the relevant R.A.F. Communiqué reads: “Capt. D. J. Bell, 3 Sqn, fired on an L.V.G. two-seater at 60 yards range and the observer was seen to fall into the cock-pit. Lts Mayer, Franklyn and Hamilton, of the same squadron, also fired at the E.A. Capt Bell fired a further burst of 50 rounds into it at close range and the E.A. was seen by the whole formation to go down in flames.”35 The four pilots (Douglas John Bell, Claude Evelyn Mayer, Adrian Winfrid Franklyn, and Hamilton) shared credit for the destruction of this plane.36
 The next day Hamilton received sole credit for destroying an Albatros DV, a single-seater fighter, over Ovillers (Ovillers-la-Boisselle).37 Hamilton was flying Camel D651938; his combat report describes the “Albatros Scout” he encountered at “7.15pm.” as “Black & White & Green Spots.” His combat report narrative reads: “Over OVILLERS we engaged 5 E.A. and later 5 more joined. I was flying about 400 feet below the rest of the formation. Our leader headed 1 E.A. down and he came down past me in a dive. I turned on him and followed him down to about 4,000 feet, firing all the time, about 250 rounds in all. I saw a burst of flame in his cock-pit which went out and began smoking. I circled round him, and eventually saw him crash and immediately burst into flames. I also saw 1 E.A. falling down with his wings off and 1 spinning down out of control. The one I engaged fell at BOISELLE.”39 Hamilton wrote home about this victory, and an account of the letter (unfortunately not directly quoted) appeared in the Burlington Free Press:
Young Hamilton on the day he wrote . . . had brought down his first individual Hun, although previous to that he had participated in fights when the Huns had gone down but his entire “flight” of six machines had chipped in to do the trick. The fight was on April 12 . . . and in this fight Hamilton’s “flight” of six machines accounted for at least four Hun machines in the space of two hours and all returned safely. In the letter to his father Hamilton wrote from time to time during the day. At 5:15 he tells that he is going out at 5:30 and hopes that he can get his individual Hun. At 9:30 he resumes writing and has won his victory. The flight . . . went far over the German lines. When they were returning they pounced on five German albatrosses. . . . Hamilton was flying below the rest of the formation when he saw what he describes as “a beautiful black and white machine with spots on it.” The Hun tried flight but Hamilton was “on his tail.” . . . The American poured 400 rounds of ammunition as fast as he could work his machine guns. He saw flames burst out in the cock pit of the German’s machine and saw him dive for the earth. They were then up in the air 9,000 feet and Hamilton followed him down a mile to about 4,000 feet and saw him crash to the earth in a burst of flames, which covered him. The Hun was later declared officially dead and was credited to Hamilton. The rest of the flight was meanwhile engaged in battle with other members of the Hun flight and Hamilton turned to the right to climb back up to their assistance when another Hun machine flashed by him and dashed to the ground. The machine turned out to be the victim of the captain of the English flight. Hamilton was then so near the ground that he was plainly visible and four Hun machines started after him while the anti-aircraft guns opened up a hot fire. He got away, however, and with the rest of the flight returned safely. They were sure they had accounted for four and possibly five machines.40
Hamilton had apparently witnessed the shooting down of an Albatros by (Captain) Bell, one of two Albatroses credited to Bell that day around 7 p.m. George Raby Riley, also of C flight, is also credited with an Albatros shortly after 7 p.m. that day.41
Aside from such encounters as those on April 11 and 12, 1918, Kinney records that: “Much of our flying continued to be low bombing and strafing which brought us well within the range of German ground fire and we frequently returned to base with bullet holes through our planes.” And, as Riley recalled, “At this time, we were very much up against Manfred von Richthofen and his Flying Circus.”42 On April 20, 1918, around 6 p.m., No. 3 Squadron’s A and C flights (the latter led, unusually, by the squadron C.O., Richard Raymond-Barker) engaged Richthofen’s Jagdgeschwader 1 in the vicinity of Villers-Bretonneux. In his combat report Hamilton describes the hostile aircraft as “5 Fokker Triplanes, painted solid colours. One red, one blue, etc.” Hamilton recorded that he “was in the back of our formation, and almost as soon as engagement began saw one of our Camels go down in Flames”; this was apparently Raymond-Barker, shot down and killed by Richthofen in his red Fokker. Hamilton, in Camel D6519, dove down on a blue triplane and fired at it from about 100 yards; he “watched him go down and then into a spin, but could not say he was out of control.” When Hamilton pulled out of his dive, the enemy planes were no longer visible.43
Three weeks later, on May 10, 1918, Hamilton, again flying Camel D6519, had another encounter with enemy aircraft. This time he and Tipton took part in a wireless interception against two Rumpler two-seater reconnaissance planes that were flying at about 16,000 feet over Grévillers (map reference 57C.G.30), just under two miles west of Bapaume.44 Hamilton, at 18,000 feet, with Tipton, dove out of the sun at one of the planes and was able to get under its tail and fire. Hamilton followed the plane down “to 6,000 feet when I was obliged to pull out of dive to avoid collision. I think the Observer of the E.A. was killed by my first burst of bullets, as he collapsed in his seat and did not fire a shot.”45 Tipton reported that he (Tipton) “followed E.A. down to 5,000 feet and left him still diving just E. of BAPAUME apparently under control. . . . The other E.A. went off E. at the commencement of the fight.”46
While on Wireless interception with Capt Bell and Lieut. Hubbard, I suddenly saw Capt Bell who was leading begin going down in a series of Immelmans through a hole in the clouds. On following, I saw he was manoeuvring to attack an E.A. 2-seater which was directly above us about over 57D.R32 at 5000 feet. At 12-40 Capt. Bell dived on E.A. with Lieut Hubbard and myself behind, E.A.s observer opened fire, and I saw pieces flying of [sic; sc. off?] behind Capt. Bells Machine which immediately began to fall entirely out of control, and the machine appeared to collapse. I saw him crash on the ground at about 57D.R.32. I then opened fire on the E.A which was diving East, from obove [sic] and behind his tail at close range, and the observer, who up to then had been firing, ceased. When I zoomed away, Lieut Hubbard took my place, and began firing from 50 yards. I turned in time to see Lieut Hubbard zoom away, and E.A. stall badly, after which it began falling anyhow, quite out of control. We followed E.A down to 1500 feet over 57C.M.16 still firing and were machine gunned badly from the ground, owing to which we did not see E.A. crash.48
Cook says of this encounter that “Although unofficial sources report that the German went down in flames, the victory list of No. 3 Squadron indicates that the two engaged in combat with the German, but did not receive credit for sending it down. From this it must be assumed that the skillful German crew was able to make good their escape.”49 The combat report describes the plane as “out of control” (rather than “down in flames”). In their Introduction to Above the Trenches, Christopher Shores, Norman Franks, and Russell Guest note that after May 19, 1918, “out of control claims” ceased to be listed in R.A.F. communiqués “due to their sheer volume,” and this may account for Bell, Hubbard, and Hamilton apparently not receiving credit in No. 3 Squadron records. Modern claims compendia include the Albatros out of control from this encounter among Hamilton’s (and Bell’s and Hubbard’s) claims.50
Hamilton is also credited by modern claims compendia with an out of control Albatros DV on June 3, 1918; the German single-seater “fell like a leaf” over Adinfer Wood (about twenty miles northeast of Valheureux).51 Four days later, on June 7, 1918, Hamilton, Tipton, and James Richardson Montgomery attacked a kite balloon, apparently near Courcelette, about twenty miles east of Valheureux.52 The balloon reportedly “wrinkled up, collapsed and fell to the ground”; its “observer jumped.”53 In a memo written the same day recommending Tipton for promotion to flight commander in the United States Air Service, the No. 3 Squadron C.O., Raymond McClintock (who had replaced Raymond-Barker), credits Tipton with “1 Balloon destroyed with Lts. Hamilton and Montgomery” on this date.54
This was apparently Hamilton’s last decisive victory with No. 3 Squadron, although he was involved in several combats later in the month.55 On June 15, 1918, he was flying a wireless interception in the early afternoon with Hazel LeRoy Wallace, recently transferred from No. 201 to No. 3 Squadron; they each fired on a two-seater D.F.W. they had sighted near Achiet-le-Grand (map reference 57C.G.3). They broke off when they were below 2,000 feet and the “E.A. was last seen diving vertically near the ground.” The encounter was labeled “1 Indecisive Combat.”56 The two men were again on a wireless interception patrol early the next morning when they encountered six German fighter planes, apparently Pfalz DIIIs, in the general vicinity of Mory (57C.B); these they followed about fifteen miles south southwest to Albert where “having been joined by 3 S.E5s, we attacked E.A. over 57D.W.30 [just east of Albert] at 13,000 feet at 7:45 am.” Hamilton and Wallace each singled out a machine and fired at their respective targets. “All E.A. immediately dived East and disappeared behing [sic] their Balloon Line.” The jointly signed combat report is annotated “2 Indecisive Combats.”57 The next day, June 17, 1918, Hamilton, Tipton, and Wallace, and probably others, attacked a number of German balloons, apparently succeeding “in destroying five.”58 Hamilton, still flying Camel D6519, is recorded as having that day driven a balloon down south of Miraumont, twenty miles due east of Valheureux.59
With the U.S. 17th Aero Squadron
On June 20, 1918, Hamilton, released from No. 3 Squadron, reported, along with Tipton, to the U.S. 17th Aero Squadron, where the next day he was appointed commander of C flight, with Henry Bradley Frost as his deputy (Tipton was appointed commander of B flight).60 The 17th, whose enlisted men and officers, like those of the 148th, had been dispersed for training shortly after arriving in Europe in January 1918, had reassembled at Petite Synthe near Dunkirk on June 20, 1918, with pilots, like Hamilton, joining them on that and subsequent days.61 The 17th flew Camels and, along with the 148th, was American in personnel, but stationed on the British Front and under the tactical command of the R.A.F. until late in the war when they were moved south to the American Front.
The newly arrived pilots of the 17th used the last ten days of June to bring in their planes from the airplane supply depot at Marquise. Hamilton, according to Murton Campbell, came down with Spanish flu after the first trip to Marquise on the 21st, but was ready to start flying on June 24, 1918.62
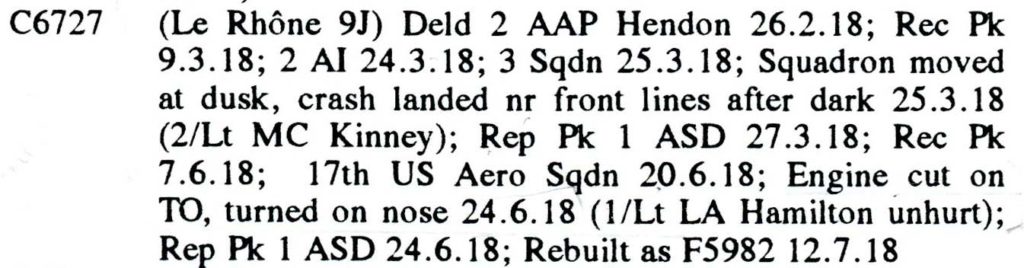
Unfortunately, when he attempted to take off on his first “flip,” his engine cut out, and the plane ended up on its nose at the end of the runway; Hamilton was not hurt.63 He had been given Camel C6727, which his No. 3 squadron-mate Kinney had crashed in the dark March 25, 1918, during the move to Valheureux.64 Like many of the Camels allotted to the 17th, C6727 had already seen hard use; the squadron encountered more than their share of mechanical problems.65
The squadron had about three weeks to get to know their equipment and their territory—far northwest Belgium and particularly the Belgian coast—while working on formation flying (and crossing the lines, despite R.A.F. regulations). On July 15, 1918, they flew their first offensive patrol; they began escorting DH.9 bombers from No. 211 Squadron R.A.F. into German occupied territory on July 20, 1918.66 Hamilton missed the latter milestone. Having been at the front four months, he was taking his allotted and overdue two weeks leave in England. On July 18, 1918, Milnor, now working at American Aviation HQ at 35 Eaton Place in London, wrote in his diary “About three o’clock Ham walked into the office and maybe I wasn’t glad to see him. H is coming around to the flat to live with me and that is the best news I’ve had yet. He is booked at the Savoy for to night but tomorrow he is coming around for his two weeks.” They talked late into the night, “consumed considerable Scotch,” and dined out and went to the theater with other men from the Oxford detachments who happened to be in London.66a Hamilton left on August 1, 1918, arriving back at the squadron the next day, along with Murton Campbell.67
Hamilton presumably participated in the August 3, 1918, offensive patrol which resulted in combat victories for Murton Campbell and William Joseph Armstrong in the vicinity of Roulers, but also the loss of Murray Kenneth Spidle; Hamilton was among those who went out in the afternoon to look for him, in vain.68
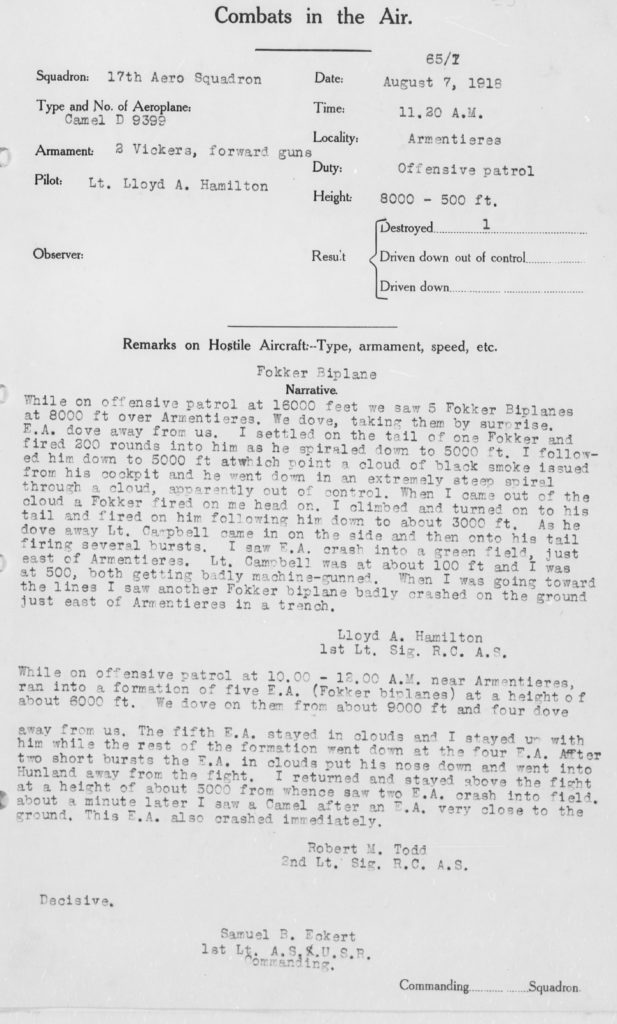
There was little aerial activity over the next few days because of inclement weather. On August 7, 1918, the 17th again sent out a late morning offensive patrol. They headed south-southeast at 16,000 feet. Once over Armentières, they espied a flight of five Fokkers beneath them at about 5,000 feet. Hamilton, in Camel D9399, shot down and was credited with his first Fokker; he very nearly got a second, which was ultimately finished off by Murton Campbell.69
Over the next few days the 17th conducted offensive patrols and bombing raids, and provided bomber escort. They also rehearsed the long-planned raid on Varsenare, “a huge aerodrome housing an estimated five Gotha and Fokker squadrons south-southeast of Bruges—about 40 air miles from Petite Synthe. Being the source of the many raids against Dunkirk, it was a continuing thorn in the British side.”70 The raid, after postponements caused by bad weather, and despite the 17th’s loss of several pilots, took place on August 13, 1918. Working together, R.A.F. squadrons and the 17th caused extensive damage. As they “neared the aerodrome it was seen that three Flights of Fokkers were lined up on the ground with engines running, and that officers and mechanics were standing about. The surprise was complete and the Germans could do nothing before the bombs began to explode. For ten minutes the scene was one of chaos. Flames leaped from hangars and aeroplanes and from a petrol dump, buildings collapsed, and the rattle of the machine-guns of the Sopwith ‘Camels’ mingled with the noise of the exploding bombs.”71 Hamilton’s activity during the raid is described in the 17th’s report: “Dropped four bombs on north hangars from about 200 feet, shot fifty rounds into the windows of the château, made four circuits of the field shooting at a row of five Fokkers on the ground with engines running up. On first circuit shot first enemy machine in this line and saw it burst into flames, on the third circuit shot third enemy machine in the line and saw it burst into flames.”72 All the Allied aircraft returned safely to their aerodromes.
The 17th went out again the next morning to escort DH.9s from No. 211 Squadron on a mission to photograph the aftermath of the Varsenare raid and to bomb Bruges. In the vicinity of Bruges, the patrol encountered six Fokkers and, on the return journey, after the photos had been taken, engaged with them. Jesse Frank Campbell, Robert Miles Todd, and Hamilton (flying Camel D1940) fired at a Fokker that was diving on a DH.9 piloted by Lt. Don Ryan Harris, an American flying with 211. Harris was able to report that the pilot of the Fokker was apparently killed; Harris’s observer saw the plane crash. Jesse Campbell, Todd, and Hamilton shared credit; in a letter home Todd wrote: “It was impossible to tell whose bullets reached him first so we split him up between us.”73
The evening of the same day (August 14, 1918), Hamilton took part in an offensive patrol that saw fifteen to twenty Fokkers attacking about eight Bristol Fighters; Hamilton opened fire on a Fokker that was on its own west of the others. He described how it “went down on his back and down in a slow spiral still on his back.” He was unable to continue watching, as he himself was now attacked by three Fokkers who chased him back to friendly lines. The combat was labelled “Indecisive.”74 Otis Lowell Reed and George Roland describe the encounter in Camel Drivers and write that Hamilton “declined to claim [the Fokker] because he considered its antics suspicious.”75
Three days later, on August 17, 1918, the 17th travelled south from Petite Synthe to the (British) Third Army area, specifically, to Auxi-le-Château—about twelve miles northwest of Valheureux, where No. 3 Squadron was still stationed—in preparation for what became known as the Second Battle of Bapaume.76 They joined the 148th, which had arrived there five days previously. The 17th was again to escort R.A.F. bombers, but also to do their own bombing and strafing. The next day the weather did not permit flying, but on the 19th, they were able, as Murton Campbell recorded in his diary for that day, to go “out on a Cooke’s tour of the lines, from Arras to Albert as that is the front we are to work on. There are quite a good number of landmarks if we get lost.”
The 17th made their first patrol from Auxi around mid-day on August 21, 1918, the opening day of the effort to retake Albert and Bapaume. They were escorting the R.E.8s of No. 6 Squadron R.A.F. on a mission to drop bombs in the vicinity of Cambrai—well within German-held territory. They encountered at least two flights of Fokkers just short of their target, but were able to protect their R.E.8s and shoot down several of the attacking planes; Hamilton accounted for one of the downed Fokkers. The three flights of the 17th went out again in the afternoon, this time as bombers rather than escort. While leading C flight back from a successful attack on the railroad station at St. Leger, Hamilton and Todd attacked and destroyed an observation balloon about a mile north northeast of Bapaume.77
The next day brought another escort assignment, this time accompanying R.E.8s to Bapaume. They encountered a number of Fokkers; Hamilton targeted one near Frémicourt (map reference 57c.H.30) and drove it down to 1500 feet—but then his guns jammed and he last saw the Fokker still under control.78
On the 23rd the 17th’s assignment was low bombing of the retreating Germans, focused on roads leading into Bapaume from the southwest. Around 2:00 p.m. Hamilton, along with Jesse Frank Campbell and Tipton, took part in the third of the five such raids that day.79
The next day’s assignment was, as Reed and Roland describe it in Camel Drivers, “the trickiest yet. The 17th and 148th were to cooperate in the continuous bombing and strafing of an area ten miles wide and five miles deep northeast of Bapaume. By now the enemy was pulling back through that city and the Camels were to strike them every twenty minutes as they went.”80 It was decided that larger formations were not needed, and that the pilots would go out in pairs once the weather cleared, which it did in the early afternoon.
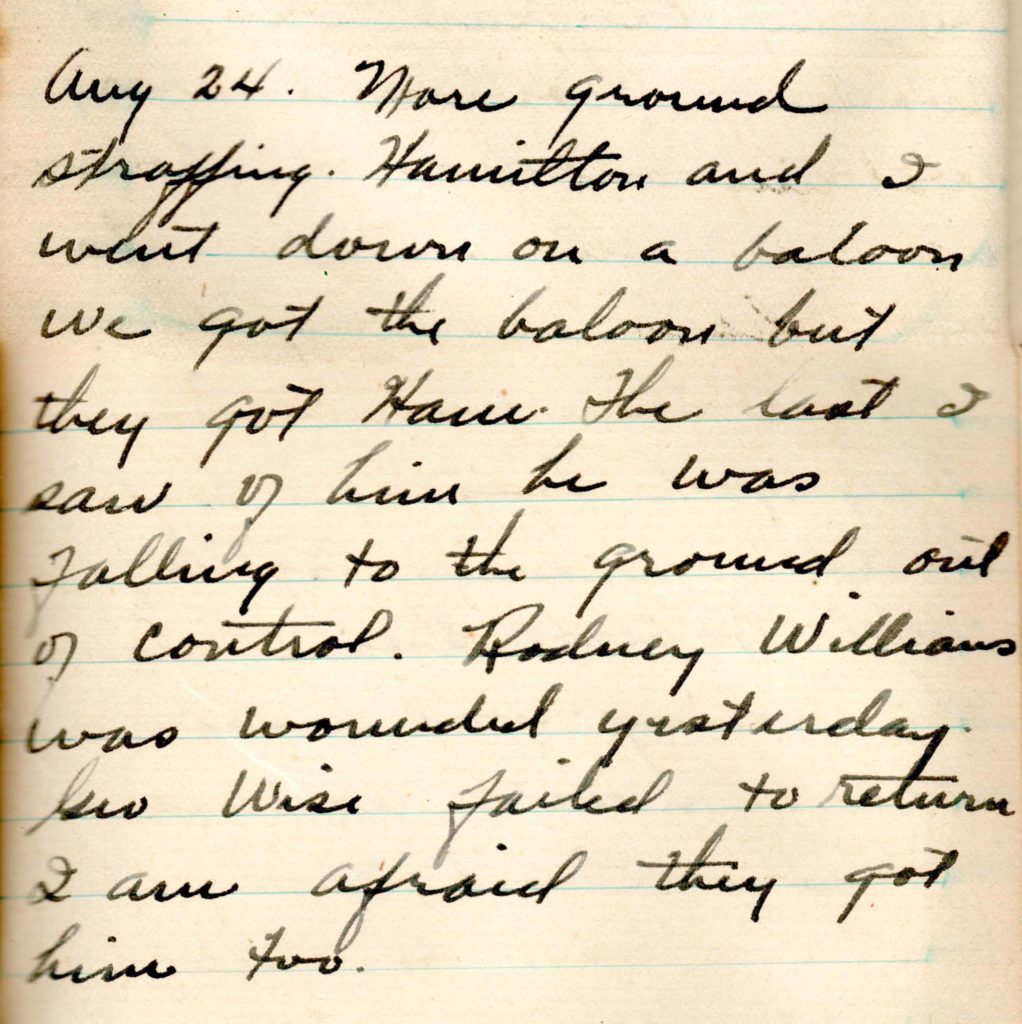
Hamilton and Jesse Campbell were the second team, and they dropped bombs, according to the relevant bombing report, “on hut and transport at 57c.I.20.,” i.e., about halfway between Frémicourt and Beugny.81 Their main task accomplished, they flew towards a German observation balloon spotted floating at about 1,000 feet from the ground at “57c.I.34″—to the southeast of where they had dropped their bombs and about halfway between Beugny and Haplincourt.82 They fired on the balloon, and it burst into flames and went down. Jesse Campbell’s combat report states that “I saw Lieut. Hamilton firing all the way down at close range on it.” Under “Remarks” in the same report, it is stated that “Lt. Hamilton did not return from patrol and was seen by Lt. Campbell as above apparently out of control near the balloon.” Hamilton had been killed in action.
Epilogue
On about September 12, 1918, Hamilton’s parents received a letter from the medical officer of the 17th Aero Squadron, Dr. Jacob Johnson Ross, telling them that their son had “gone down in his machine behind the German lines and was probably killed.”83 Ross had worked at Syracuse University during part of the time that Hamilton was studying there and knew the family. He wrote: “[Hamilton] was without doubt the best pilot we had, fearless and heady. I have seen him come in during the push with his wings literally shot to pieces. At the time he was due back I was standing with Lieut. [David Torrey] Wells and had just remarked that the strain had been terrific, as we wanted to know who failed to return, especially so in the case of ‘Ham,’ as I knew his parents and we had many things in common. When we went to Jesse Campbell of Detroit, who was up with him, he said he saw him go down apparently out of control. He did not go down far back of the lines and if this push continues they may pass the place where he was seen to go down. If we are still here I will make a trip to that spot and see what I can learn.”84 In early November, Hamilton’s parents and his fiancée received word through the Red Cross that Hamilton had been killed.85
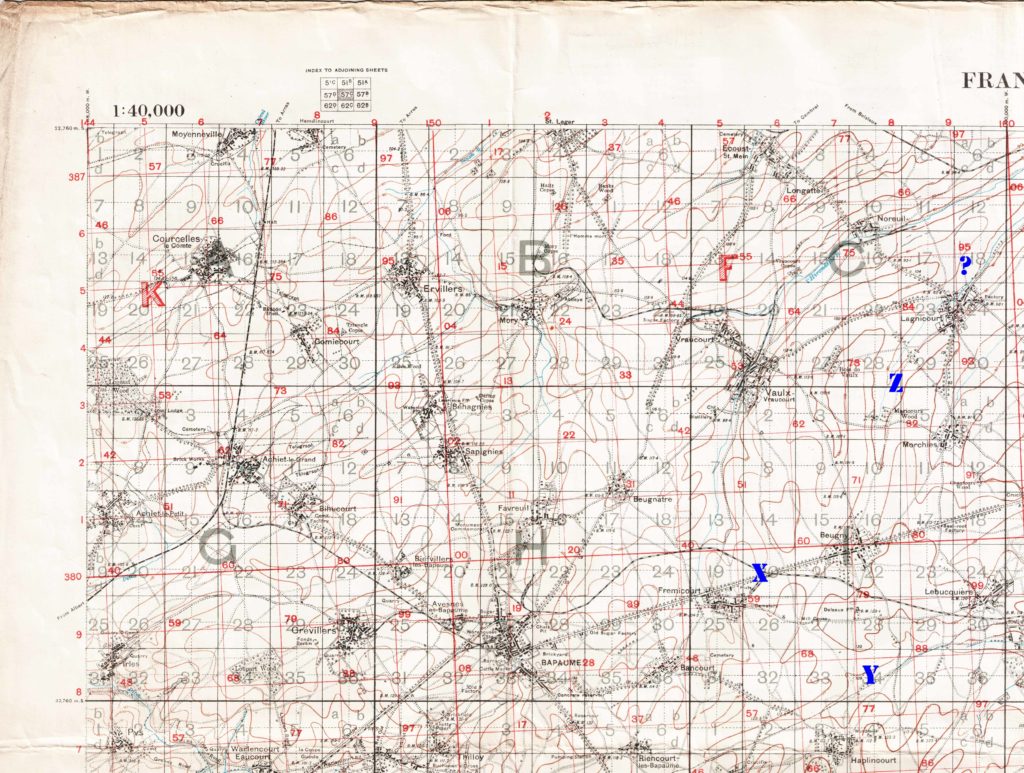
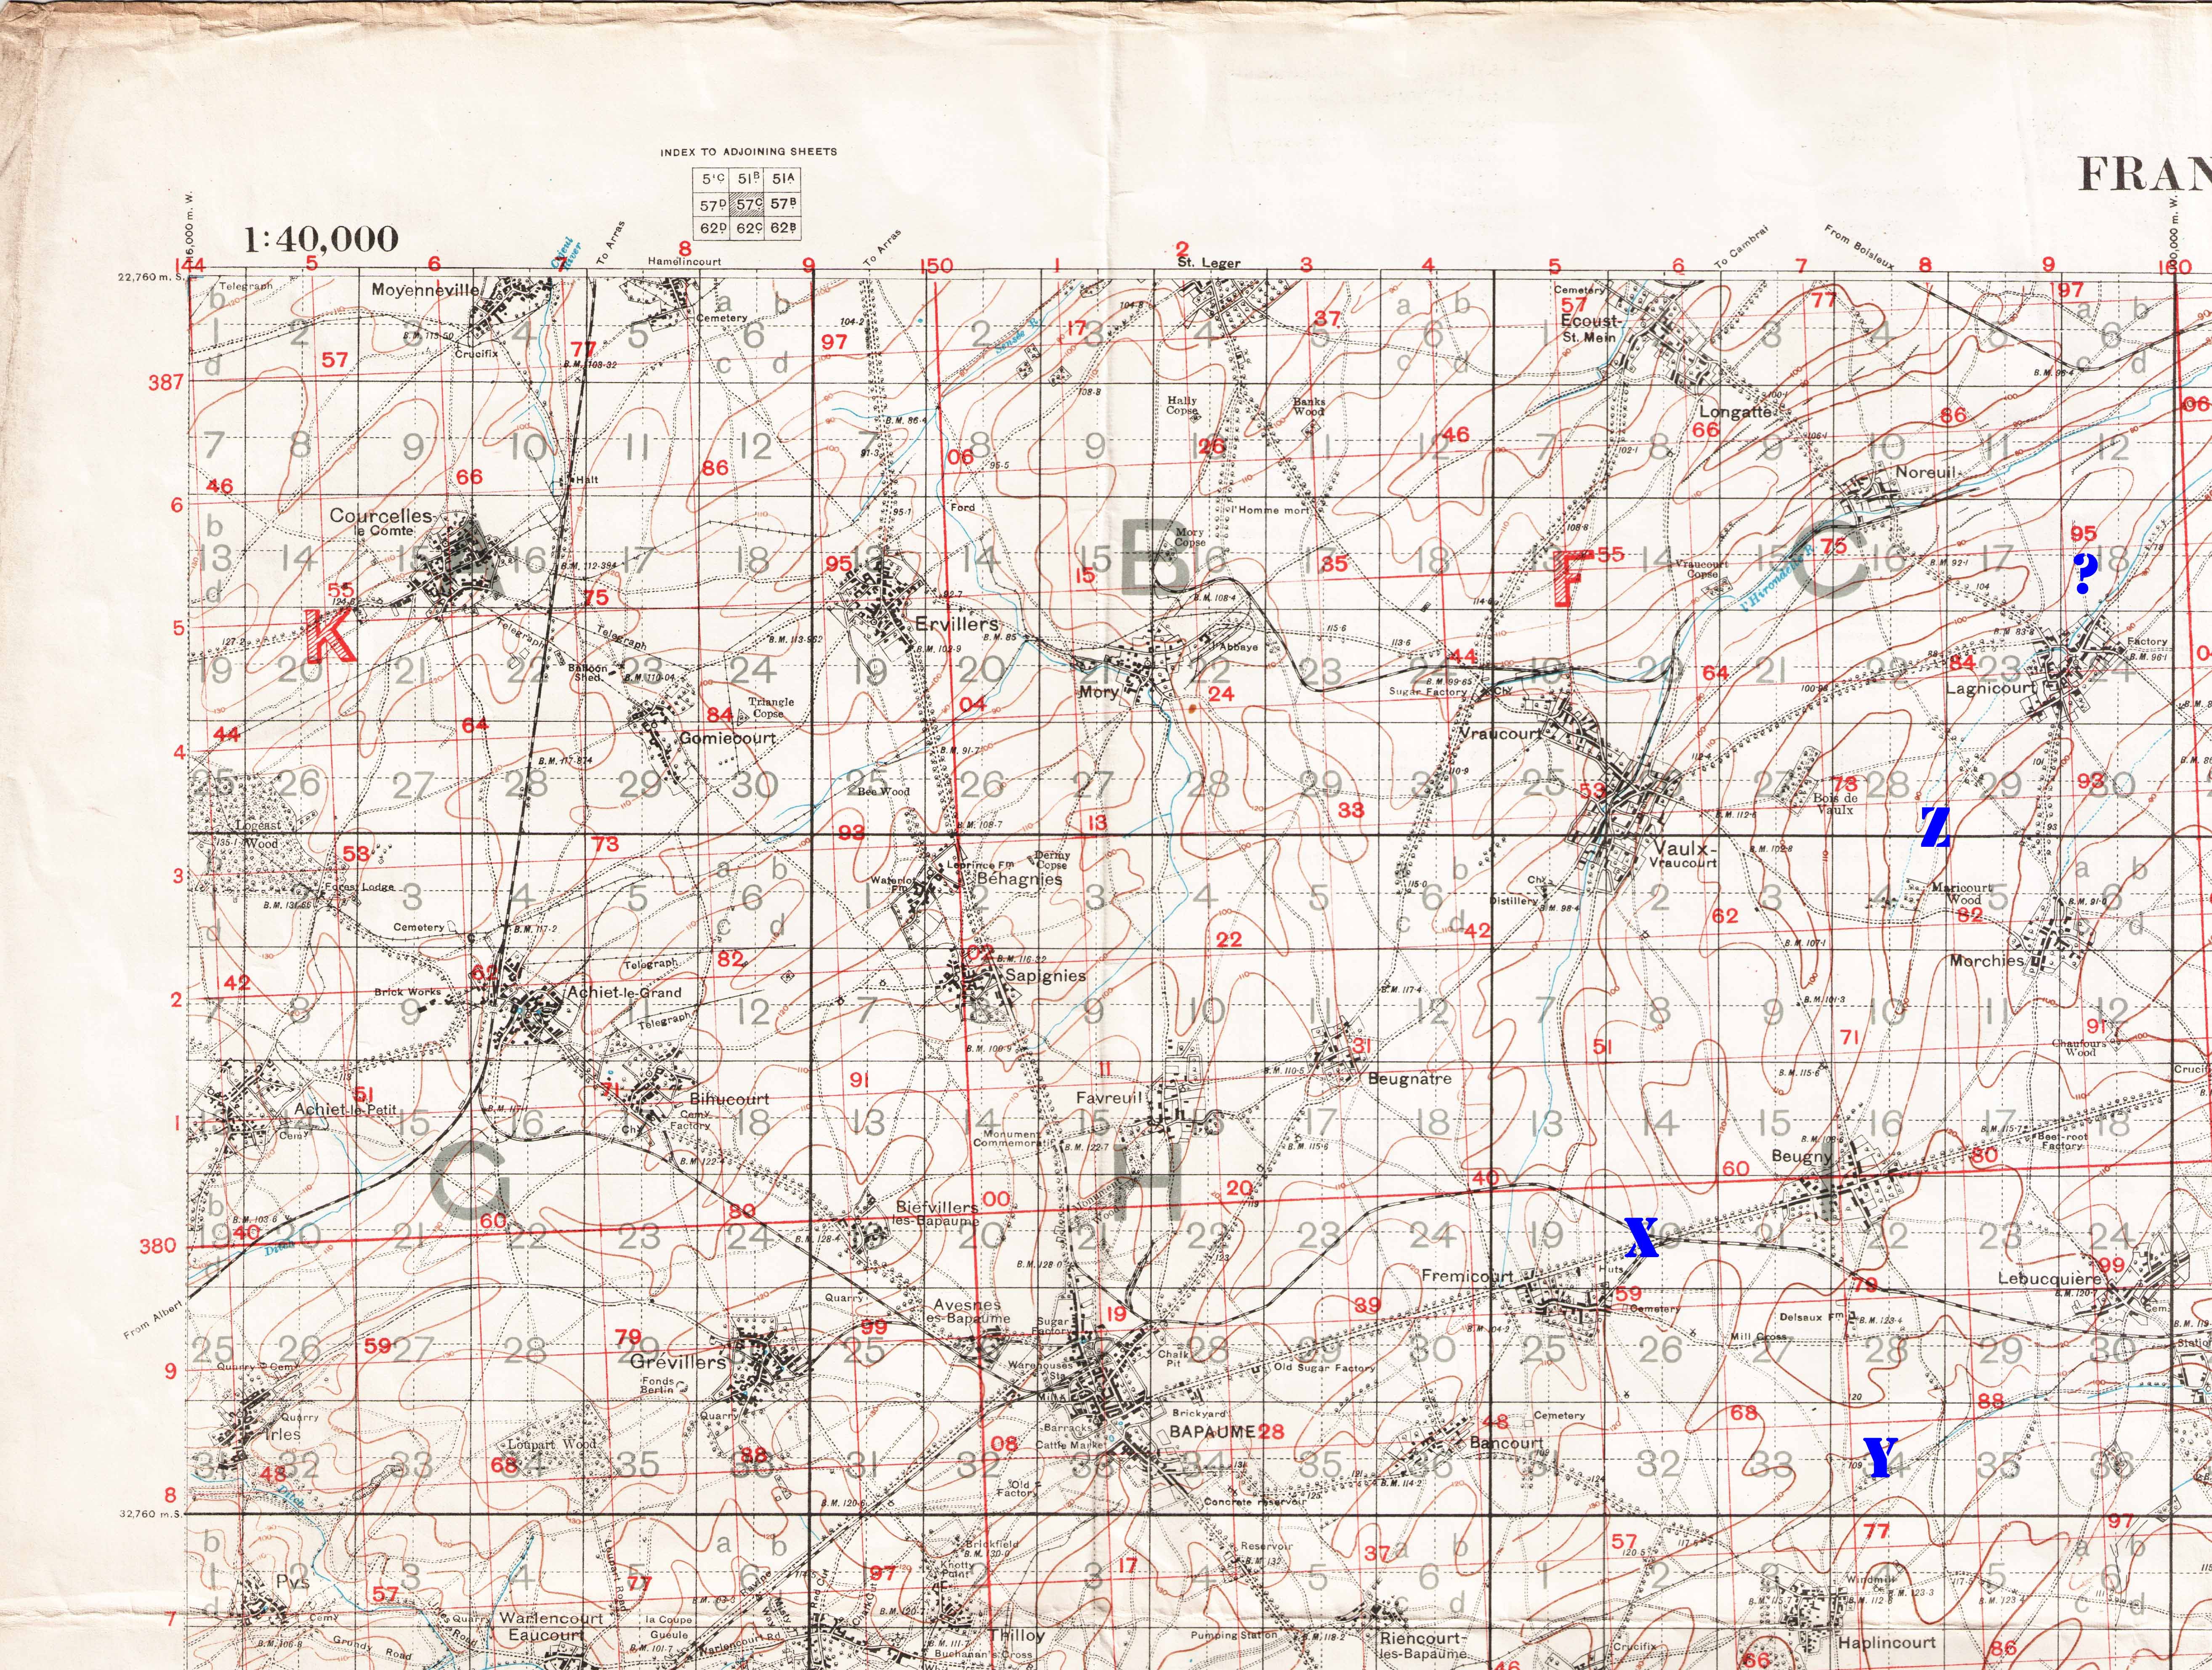
The location—“Lagnicourt (Pas de Calais) 13 NW E157.95 N382.90″—of the grave of an “unidentified airman” was apparently known to the British as early as October 1918.86 Both a location and the identity were known to German officials, and the information was passed on by German intelligence officer Hans Schröder to at least two American pilots from the 17th Aero who had been taken prisoner: George Thomas Wise, who was shot down and captured the day Hamilton was killed, and Howard Knotts, who was captured on October 14, 1918.87 The latter, released, returned briefly to the 17th at Toul and in January 1919 was debriefed by Frederick William Zinn—whose task it was to help locate the graves of missing U.S. airmen. Knotts reported that Schröder told him Hamilton’s grave was “north of Lagnicourt,” at map reference “57C, 18c.”88 Unfortunately, this reference is incomplete, perhaps mistranscribed. Given the direction “north of Lagnicourt,” it may be that “57C, C18c” was intended, although this location was, as it turns out, apparently inaccurate.
Hamilton’s father became aware of Knotts’s information and forwarded it in a letter dated April 21, 1919, to Charles C. Pierce, head of the Graves Registration Service in France.89 Before that letter arrived, however, Pierce had received “grave location of an Aviator buried by the Germans in the Commune of Lagnicourt (Pas de Calais) Map #13NW, Coord E157.95, N382.90” (this location information uses Lambert projection coordinates; the British began using the Lambert system only towards the end of the war; it was evidently also familiar to Americans).
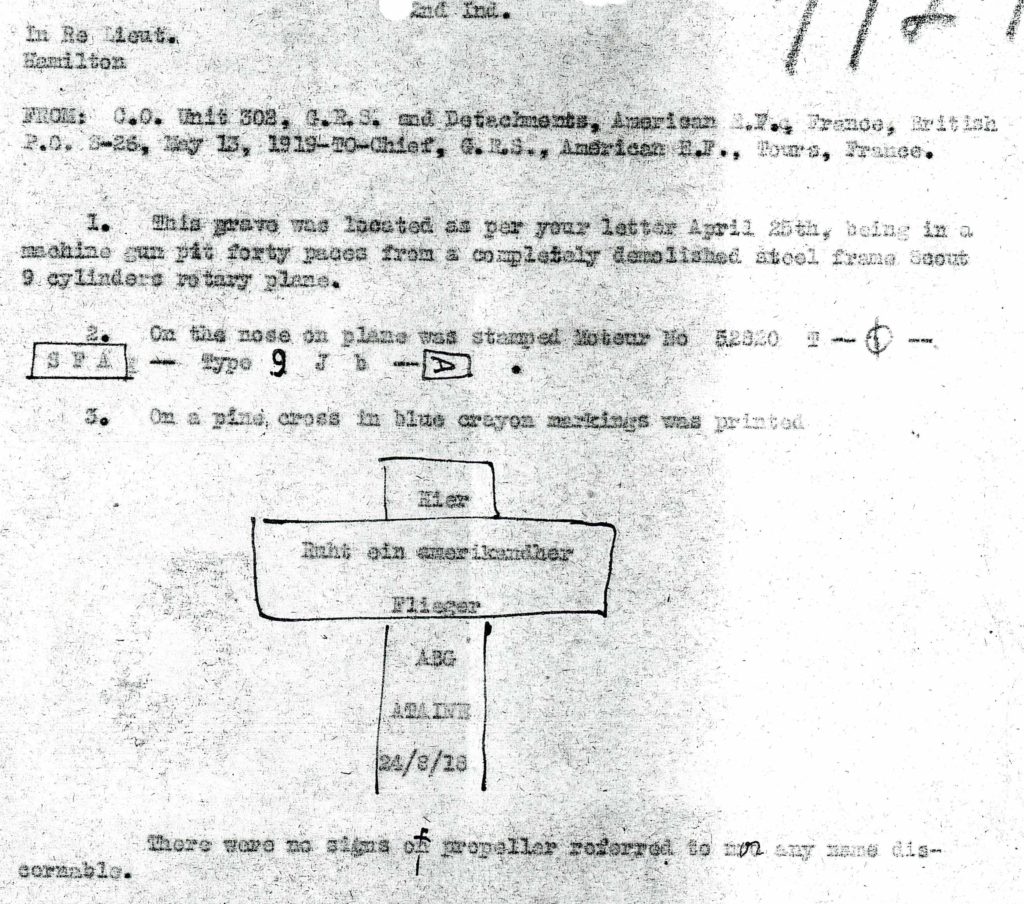
Pierce’s information also states that “On cross erected by the Germans is the inscription: ‘Here lies American Flyer, died August 24, 1918’ and on burnt wood of propeller is the inscription ‘Mr. Lord Hamlington’.”90 James Frederic Tompkins, also of the G.R.S., whom Pierce directed to investigate the matter, reported back on May 13, 1918, that the grave had been located “in a machine gun pit forty paces from a completely demolished steel frame Scout 9 cylinders rotary plane.” The motor number was still discernible: “52820.” Tompkins provided a sketch of the cross marking the grave, with its apparently only partially legible German inscription: “Hier Ruht ein amerikandher [sic?] Flieger ABG ATAINE [gestorben?] 24/8/18″ (“Here lies an American pilot, [died?] August 24, 1918″). The propeller was no longer to be found, and there was no identification on the badly burned body—which was removed to the American military cemetery at Bony on May 8, 1919. A search of the area revealed no other American graves.91
Staff at the American 1st Air Depot at Colombey-les-Belles were able to confirm that the motor number of Hamilton’s Camel D1940 was 52820 and that “the grave mentioned . . . is unquestionably that of 1st Lieut. Lloyd A. Hamilton.”92
In March 1921 Hamilton’s body was exhumed, transported to the U.S., and reburied in Pittsfield Cemetery in Pittsfield, Massachusetts.93
Hamilton was awarded the British Distinguished Flying Cross around mid-September 1918, with his participation in the Varsenare raid particularly noted, as well as his destruction of a Fokker biplane on August 7, 1918. In 1919 he was awarded the American Distinguished Service Cross for his involvement in the Varsenare Raid.94
mrsmcq September 29, 2017; updated December 15, 201795; updated August 21, 2020 to reflect Milnor’s diary
Notes
(For complete bibliographic entries, please consult the list of works and web pages cited.)
1 Hamilton’s place and date of birth are taken from his (undated) draft registration card; see Ancestry.com, U.S., World War I Draft Registration Cards, 1917–1918, record for Lloyd Andrews Hamilton. The photo is a detail of a photo of several pilots of the 17th Aero taken by Robert Miles Todd at Petite Synthe in early July 1918.
2 On Hamilton’s ancestry, see documents available at Ancestry.com; see also Ticknor, New England Aviators 1914–1918, vol. 2, p. 129. On John Augustus Hamilton’s education and places of ministry, see Smalley, ed., Alumni Record and General Catalogue of Syracuse University, vol. 3.1, p. 794.
3 See Pittsfield, Massachusetts, Municipal register of the City of Pittsfield for 1912, p. 236; and “Tome School for Boys.”
4 Ticknor, New England Aviators 1914–1918, vol. 2, p. 126.
5 “Lieutenant Hamilton Believed to be Killed.”
6 See the entry for John A. Hamilton in H. A. Manning Co., Burlington and Winooski (Vermont) Directory 1918. And see the entry for Lloyd A. Hamilton on p. 559 of Vermont, Adjutant General’s Office, Roster of Vermont Men and Women in the Military.
7 “Twenty-five Plattsburg Men to Become Aviators” and “Aviation School List Cut.”
8 See “Ground School Graduations [for August 25, 1917]” for a list of the men in Hamilton’s ground school class.
9 Deetjen, diary entry for October 23, 1917,
10 See commentary to Hooper’s letter of November 4, 1917, in Hooper, Somewhere in France.
11 Foss, Diary, entry for November 15, 1917; see Murton Campbell’s diary entry for November 19, 1917, for the date the fifty men departed for their flying squadrons.
12 Quotation is from the caption to a photo on p. 5 of Milnor’s photo album.
12a Milnor, diary entries for November 22 through December 11, 1917.
13 Milnor, diary entries for December 20 and 31, 1917.
14 Ibid., December 31, 1917.
15 Cablegram 631-S, dated February 21, 1918.
15a Milnor, diary entries for January 17 and 20, 1918.
16 Milnor, diary entry for January 24, 1918.
17 Grider and Jacobs, Marse John Goes to War, p. 77. Cook, “Lieut. Lloyd A. Hamilton,” p. 68, also provides an account, slightly less colorful, of this incident. Cook must have had another source for the story, as he apparently did not know of the publication of Grider’s letters.
18 “South Carlton Landing Ground History.”
19 Portions of the letter are transcribed in “Lloyd Hamilton Much Talked of in English Flying Circles.” This article in the Burlington Free Press—Stoughton had been a member of the paper’s staff—is dated March 12, 1918; unfortunately the date of the letter itself is not provided, but it was probably written towards the end of February 1918.
20 Milnor, diary entry for February 5, 1918.
20a Cablegram 857-R.
20b Milnor, diary entries for March 3–5, 1918.
21 Ingalls, Hero of the Angry Sky, p. 126 (diary entry for March 2, 1918).
22 Murton Campbell, Diary, March 14, 1918.
23 Ibid., March 15, 1918.
24 See Kissel’s diary entries for March 16–20, 1918. As Campbell does not mention Clay, I surmise that he also travelled separately.
25 Murton Campbell, Diary, March 16, 1918. On Hamilton’s squadron assignment and date of assignment, see Munsell, Air Service History, p. 189 (4), and “Lieut. L. [sic] F. Hamilton American Flying Corps.”
26 Ingalls, Hero of the Angry Sky, p. 143 (diary entry for March 17, 1918).
27 Munsell, Air Service History, p. 189 (4).
27a Heater, “Americans on Day Bombing with the Independent Air Force – Royal Air Force,” p. 117; Reed and Roland, Camel Drivers, p. 35.
28 Heater, “Americans on Day Bombing with the Independent Air Force – Royal Air Force,” p. 117; Kinney, I Flew a Camel, pp. 44, 47, and 52.
29 On No. 3’s sector, see Kinney, p. 45. On work with No. 56, see Revell, High in the Empty Blue, pp. 269-71.
30 Taylor, A History of the 148th Aero Squadron, p. 19.
30a On the identity of the officer who wrote the memo, see “Help identifying ‘Capt. A. ??y’ of No. 3 Squadron R.F.C.”
31 Duke, Diary, entry for March 25, 1918.
32 Kinney, I Flew a Camel, p. 54.
33 Balfour, An Airman Marches, p. 127. I am grateful to “retread” for his February 19, 2003, posting at “Wireless Communication” for citing this passage.
34 See Individual Combat Records of Pilots with R.A.F., p. 2. Hamilton’s report indicates he was flying Camel D6580; Steve Russell’s reconstruction of Hamilton’s combat report based on a hand copied report in the Otis Reed files at the Air Force Historical Research Agency (AFHRA 1141186), which can be viewed at “Combat reports by Lloyd Andrews Hamilton (USAS) with No. 3 Squadron R.A.F.,” gives the plane’s number as D6588. A perusal of relevant entries in Sturtivant and Page’s The Camel File indicates that neither of these planes was with No. 3 Squadron at this time; in connection with the entry for Camel C1691 and this combat, Sturtivant and Page list D6580 with quote marks, apparently indicating skepticism about the plane number. Shores, Franks, and Guest, Above the Trenches, in their entry for Hamilton, p. 183, leave the plane number blank.
35 Great Britain, Royal Air Force, Royal Air Force Communiqués 1918, p. 32. Cook, who apparently knew only Hamilton’s combat report, writes (“Lieut. Lloyd A. Hamilton,” p. 69) that “the German dived east towards friendly lines” and was unaware that the plane ultimately went down in flames.
36 See Shores, Franks, and Guest, Above the Trenches, entry for Hamilton, p. 183. Unexpectedly, Sturtivant and Page, Camel File, entry for Camel D6475 (p. 127), also credit George Raby Riley; I have not found Riley thus credited elsewhere.
37 An entry on p. 36 of Great Britain, Royal Air Force, Royal Air Force Communiqués 1918 credits “A. M. Hamilton”; the combat of the preceding day is indexed in that work (p. 246) also under “A. M. Hamilton.”
38 Sturtivant and Page, The Camel File, p. 129, indicate that this plane was “coded ‘S’.”
39 Individual Combat Records of Pilots with R.A.F., p. 9. The report is misdated “12/5/18,” and this presumably led Cook, “Lieut. Lloyd A. Hamilton,” p. 70, to report “Hamilton’s second confirmed victory . . . on the evening of 12 May.” For reasons that are unclear, the entries for Hamilton in Shores, Franks and Guest, Above the Trenches (p. 183) and in Franks and Bailey, Over the Front (p. 41), give the time of this combat as noon, and The Aerodrome, “Lloyd Hamilton,” follows them. Franks, Bailey, and Duiven, Casualties of the German Air Service 1914-1920, list pilot Karl Lupp of Jagdstaffel 46 as the only casualty on this date at “Ovillers la Boiselle”; the time of the downing is not given. Lupp may have been Hamilton’s adversary, but incomplete records and other uncertainties mean this identification is speculative. Ovillers-la-Boisselle (Hamilton’s Ovillers) is about a half mile north of La Boisselle.
40 “Hunting Down Huns.”
41 Shores, Franks, and Guest, Above the Trenches, entries for “Douglas John Bell” (pp. 71–72) and “George Riley” (pp. 321–22).
42 Malinovska and Joslyn, Voices in Flight, p. 94.
43 Individual Combat Records of Pilots with R.A.F., p. 3. This April 20, 1918, encounter, occurring as it did the day before Richthofen himself was killed, has attracted some attention. See, for example, Ivan Berryman’s pictorial reconstruction at “WW1 Aces Hundredth Painting WIP”; Berryman speculates that the blue Fokker may have been that of Eberhard Mohnicke. See also Kinney’s account on pp. 57-59 of I Flew a Camel.
44 Digitized copies of map 57c can be found at “British First World War Trench Maps, 1915-1918″ and “WWI Trench Maps and Aerial Photographs.”
45 From Hamilton’s combat report, p. 8 of Individual Combat Records of Pilots with R.A.F.
46 From Tipton’s combat report, p. 7 of Individual Combat Records of Pilots with R.A.F.
47 From Hamilton’s combat report, p. 10 of Individual Combat Records of Pilots with R.A.F.; I find no corresponding report from Tipton. On Illinois-born Macklin (October 18, 1898–May 30, 1918) see “Charles Purcell [sic] Macklin First Lieutenant, R.A.F.”
48 This is the transcription provided by Nick Hubbard, Will Hubbard’s great-great-grandson, at “Correction to WW1 pilot Will Hubbard please.” The report provides Hamilton’s plane number; the number of Bell’s plane and the time of the mission are taken from Sturtivant and Page, The Camel File, p. 104. Henshaw, The Sky Their Battlefield II, notes, p. 176, that an “SE” combat claim made by [Werner] Heinzelmann and Rosenau of Fliegerabteilung (Artillerie) 259 might correspond to the downing of Bell; Shores, Franks, and Guest, Above the Trenches, p. 72, indicate that Bell was “possibly shot down by the reconnaissance crew” Rosenau and Heinzelmann.
49 Cook, “Lieut. Lloyd A. Hamilton,” p. 71; Cook does not indicate what the “unofficial sources” were.
50 See Shores, Franks, and Guest, Above the Trenches, pp. 6 and 7, and their entries for Hamilton, p. 183; for Bell, p. 72; for Hubbard, p. 202. And see Franks and Bailey, Over the Front, p. 41.
51 See Shores, Franks, and Guest, Above the Trenches, p. 183; and Franks and Bailey, Over the Front, p. 41; the time given in both these works is “2030.” The entry for Camel C1631 on p. 99 of Sturtivant and Page, The Camel File, gives the time as “08.20″ and provides the quotation, which is presumably taken from a combat report whose location I have not been able to ascertain.
52 This is the first of Hamilton’s enemy combats recorded in Munsell, “Air Service History,” in the entry for Hamilton on p. 189 (4). The map coordinates provided appear to be “57-D-R30 : 57C.M.15,” suggesting the combat took place in an area stretching from around Courcelette northeast to the vicinity of Le Sars. Munsell indicates the claim was shared with Tipton, but does not mention Montgomery (born in Hawick, Scotland, December 13, 1893; KIA September 16, 1918).
53 “wrinkled . . .” cited, apparently from a combat report, by Olynyk in his post at “Combat reports . . . . ” “observer jumped” is cited in the entries for the three men’s respective planes (D6519, Hamilton; D6673, Tipton; B5419, Montgomery) in Sturtivant and Page, The Camel File.
54 A copy of this memo was posted by Steve Russell to the discussion thread “Combat reports . . . .”
55 Supporting evidence has thus far not been found for the combat victory on June 8, 1918, listed on p. 41 of “Confirmed Victories U.S. Air Service Officers Attached to Royal Air Force Squadrons,” nor for the one listed there and by Munsell, Air Service History, p. 189 (4) under the date June 18, 1918. This is perhaps also the place to note that Munsell lists, citing Hamilton’s D.F.C. citation, two enemy aircraft destroyed on July 12, 1918; they also appear on p. 41 of “Confirmed Victories U.S. Air Service Officers Attached to Royal Air Force Squadrons.” Munsell assumes these occurred while Hamilton was with No. 3, but, in fact, by that time Hamilton was with the U.S. 17th Aero—which has no record of these combats. It appears that the D.F.C. citation, surprisingly, is in error.
56 See the combat record signed by both men, Individual Combat Records of Pilots with R.A.F., p. 14.
57 Individual Combat Records of Pilots with R.A.F., p. 15.
58 Cook, “Lieut. Lloyd A. Hamilton,” p.72.
59 See the entry for Camel D6519 on p. 129 of Sturtivant and Page, The Camel File.
60 See Murton Campbell, diary entry for June 20, 1918, regarding encountering Hamilton and Tipton that day. See Clapp, p. 155, on Hamilton’s appointment as flight leader, p. 16 on Tipton; Reed and Roland, Camel Drivers, p. 30, on Frost.
61 Clapp, A History of the 17th Aero Squadron, pp. 8–13 and 155-56.
62 See Murton Campbell, diary entry for June 21, 1918, on Hamilton’s illness.
63 See Reed and Roland, Camel Drivers, p. 32, on his accident.
64 Sturtivant and Page, The Camel File, entry for C6727 on p. 104. See also Kinney, I Flew a Camel, pp. 49-51 on his crash.
65 On the planes, see “Camel Questions.”
66 See Clapp, A History of the 17th Aero Squadron, p. 24; Reed and Roland, Camel Drivers, pp. 35 and 40.
66a Milnor, diary entries for July 19–August 1, 1918.
67 Milnor, diary entry for August 1, 1918. Reed and Roland, Camel Drivers, pp. 39 and 44; the notation on p. 54 that puts Hamilton on leave on August 12, 1918, is presumably an error and should probably read “Henry Frost.”
68 Reed and Roland, Camel Drivers, p. 46; see combat reports on pp. 58 and 59 of Clapp, A History of the 17th Aero Squadron.
69 Reed and Roland, Camel Drivers, p. 48; see combat reports on pp. 59–61 of Clapp, A History of the 17th Aero Squadron and pp. 47-48 of Individual Combat Records of Pilots with R.A.F. (Clapp appears to have mistranscribed “5 Fokkers” as “8 Fokkers” in Hamilton’s report.)
70 Reed and Roland, Camel Drivers, p. 48.
71 Jones, The War in the Air, vol. 6, pp. 395-96.
72 Clapp, A History of the 17th Aero Squadron, p. 97; report is also reproduced on p. 62 of Individual Combat Records of Pilots with R.A.F.
73 See Steve Russell’s reconstruction of Hamilton’s combat report based on a hand copied report in the Otis Reed files at the Air Force Historical Research Agency (AFHRA 1141197) posted at “Combat reports. . . .” Reed and Roland, Camel Drivers, p. 62, describe the encounter. Endnote 16 to that page notes that Clapp does not include the relevant document for this shared combat victory, “although a copy of the claim in the British archives indicates it was confirmed.” See Todd’s letters home of August 16 and 19, 1918, in Todd, Sopwith Camel Fighter Ace. The quotation is on p. 84 (letter of August 19, 1918). Two DH.9 crews also shared credit: Geoffrey Harold Baker (not G.F.) and H. Lindsay, flying DH.9 B7679, and William Dalrymple Gairdner (not Gardner) and Harry Morton Moodie, flying DH.9 B7603. See Great Britain, Royal Air Force, Royal Air Force Communiqués 1918, p. 165; Sturtivant and Page, The Camel File, entry for D9399 on p. 141; Shores, Franks, and Guest, Above the Trenches, p. 183; and Pentland, Royal Flying Corps, people indices.
74 See Steve Russell’s reconstruction of Hamilton’s combat report based on a hand copied report in the Otis Reed files at the Air Force Historical Research Agency (AFHRA 1141197) posted at “Combat reports. . . .”
75 Reed and Roland, Camel Drivers, p. 63. Their source is the squadron’s “daily dawn and dusk patrol reports.”
76 See Murton Campbell, diary entry for August 17, 1918, for the date of the move, which is unclear from other sources (Clapp, A History of the 17th Aero Squadron, p. 37; Reed and Roland, Camel Drivers, pp. 64–65; Jones, The War in the Air, p. 469).
77 On the activities of August 21, 1918, see Reed and Roland, Camel Drivers, pp. 67–68, and the combat reports on pp. 66–70 of Clapp, A History of the 17th Aero Squadron; not all of these reports appear in Individual Combat Records of Pilots with R.A.F.
78 Hamilton’s combat report is on pp. 72–73 of Clapp, A History of the 17th Aero Squadron; he was probably flying Camel D1940, not D1941 (see Sturtivant and Page, The Camel File, entries for D1940 and D1941 on p. 118). Reed and Roland, Camel Drivers, p. 69, describe this mission; I suspect they are mistaken in indicating the goal was Saint Quentin and the balloons at Bray. In addition to map references in combat reports that day which all point to the vicinity of Bapaume, Jesse Campbell’s diary entry for August 22, 1918, opens: “Escorted R.E.8’s again to Bapaume and were attacked by 10 fokkers.”
79 Reed and Roland, Camel Drivers, pp. 70–71. Hamilton’s bombing report is reproduced on p. 99 of Clapp’s A History of the 17th Aero Squadron, where it is labelled as part of that day’s second raid. Reed and Roland, Camel Drivers, endnote 8 to Chapter 8, note that Clapp failed to include the report of the first bombing raid that day.
80 Reed and Roland, Camel Drivers, p. 75.
81 See the bombing report on pp. 102–03 of Clapp, A History of the 17th Aero Squadron. Reed and Roland, Camel Drivers, p. 75, write that Hamilton and Campbell bombed “transport moving east a few miles out of Lagnicourt”; their map on p. 78 places the two pilots very close to Lagnicourt. Possibly the map reference is inaccurate or mistranscribed; possibly Reed and Roland are in error.
82 Cook, “Lieut. Lloyd A. Hamilton,” p. 80, states that after dropping their bombs, Hamilton and Campbell “headed for a balloon about a mile to the north.” Again, the map reference may be incorrect, or Cook may have been misinformed. It is worth noting that there are at least three copies of the combat report (one on p. 73 of Clapp’s A History of the 17th Aero Squadron, one in The National Archives (UK) [AIR/1/1219/204/5/2634/37], and one on p. 92 of Individual Combat Records of Pilots with R.A.F.); all give the same map reference.
83 “Lieutenant Hamilton Believed to be Killed.”
84 Ibid.
85 “Hamilton’s Sacrifice.”
86 In Hamilton, World War One Burial File, see the memo dated October 10, 1918, from O[liver] D[wight] Filley to the Graves Registration Committee in Tours. The memo refers to “attached information,” which appears to be the above-cited map coordinates, although this is my surmise based on a photocopy. One can only speculate how such information came to the attention of U.S. Air Service Lt. Col. Filley, who was overseeing A.E.F. night bomber training in England.
87 A newspaper account, “In American Cemetery,” indicates that Wise contacted Hamilton’s father with information about the grave. The brief account of Wise’s time as a P.O.W. (Presenting the Experiences of Air Service Officers who were Prisoners of War in Germany, p. 319) mentions that he met an “Intelligence Officer” at Douai, but does not record anything about Hamilton’s grave. That the intelligence officer was Schröder is confirmed by Schröder’s mention of Wise on p. 330 of his Erlebter Krieg. On Schröder, see pp. 439–40 (Appendix 17: “The Spy Who Came for Dinner”) in Revell, High in the Empty Blue (cf. a similar account on p. 39 of Taylor, A History of the 148th Aero Squadron).
88 See p. 5 of Knotts’s P.O.W. narrative, which is among the unpaginated addenda to Presenting the Experiences of Air Service Officers who were Prisoners of War in Germany.
89 John Augustus Hamilton’s letter is in Hamilton, World War One Burial File.
90 Memo from Pierce to J. F. Tompkins dated April 25, 1919, in Hamilton, World War One Burial File; there is no indication what Pierce’s source was.
91 See Tompkins’s memo dated May 13, 1919, in Hamilton, World War One Burial File. The file also includes several copies of G.R.S. form No. 101-A; one dated March 16, 1920, includes the date of reburial.
92 In Hamilton, World War One Burial File, see the memo dated June 7, 1919, signed by J. F. Gallagher.
93 Cook, “Lieut. Lloyd A. Hamilton,” p. 81.
94 The approximate date of the D.F.C. award is taken from Great Britain, Royal Air Force, Royal Air Force Communiqués 1918, p. 169. The problematic reference in the D.F.C. citation to two enemy aircraft destroyed on July 12, 1918, has been discussed above. The text of both citations is transcribed at The Aerodrome, “Lloyd Hamilton.”
95 Updates reflect information from Hamilton’s burial file and the map of 57C with Lambert projection coordinates.